BIOS and Emulator Core Management
Some emulated systems require BIOS files to run games. Without the correct BIOS files, games for those systems will fail to launch. The plugin can download BIOS files directly from your RomM server.
Which BIOS files a system needs depends on the emulator core in use — some cores need BIOS, some don't. Because the two concerns are related but independent, the plugin presents the active core and its BIOS state together in one place: the System page, a top-level QAM destination. Core selection and BIOS file management can each be used on their own — they share a screen only because the active core determines which BIOS files matter.
What Are BIOS Files?
BIOS (Basic Input/Output System) files are firmware dumps from original hardware. Emulators need them to accurately simulate the console's boot process. Common examples:
- PlayStation —
scph5501.bin(and other regional variants) - Dreamcast —
dc_boot.bin,dc_flash.bin - Saturn —
sega_101.bin,mpr-17933.bin
Not all systems need BIOS files. Cartridge-based systems like Game Boy, SNES, and Genesis typically work without them.
BIOS Status on the Game Detail Page
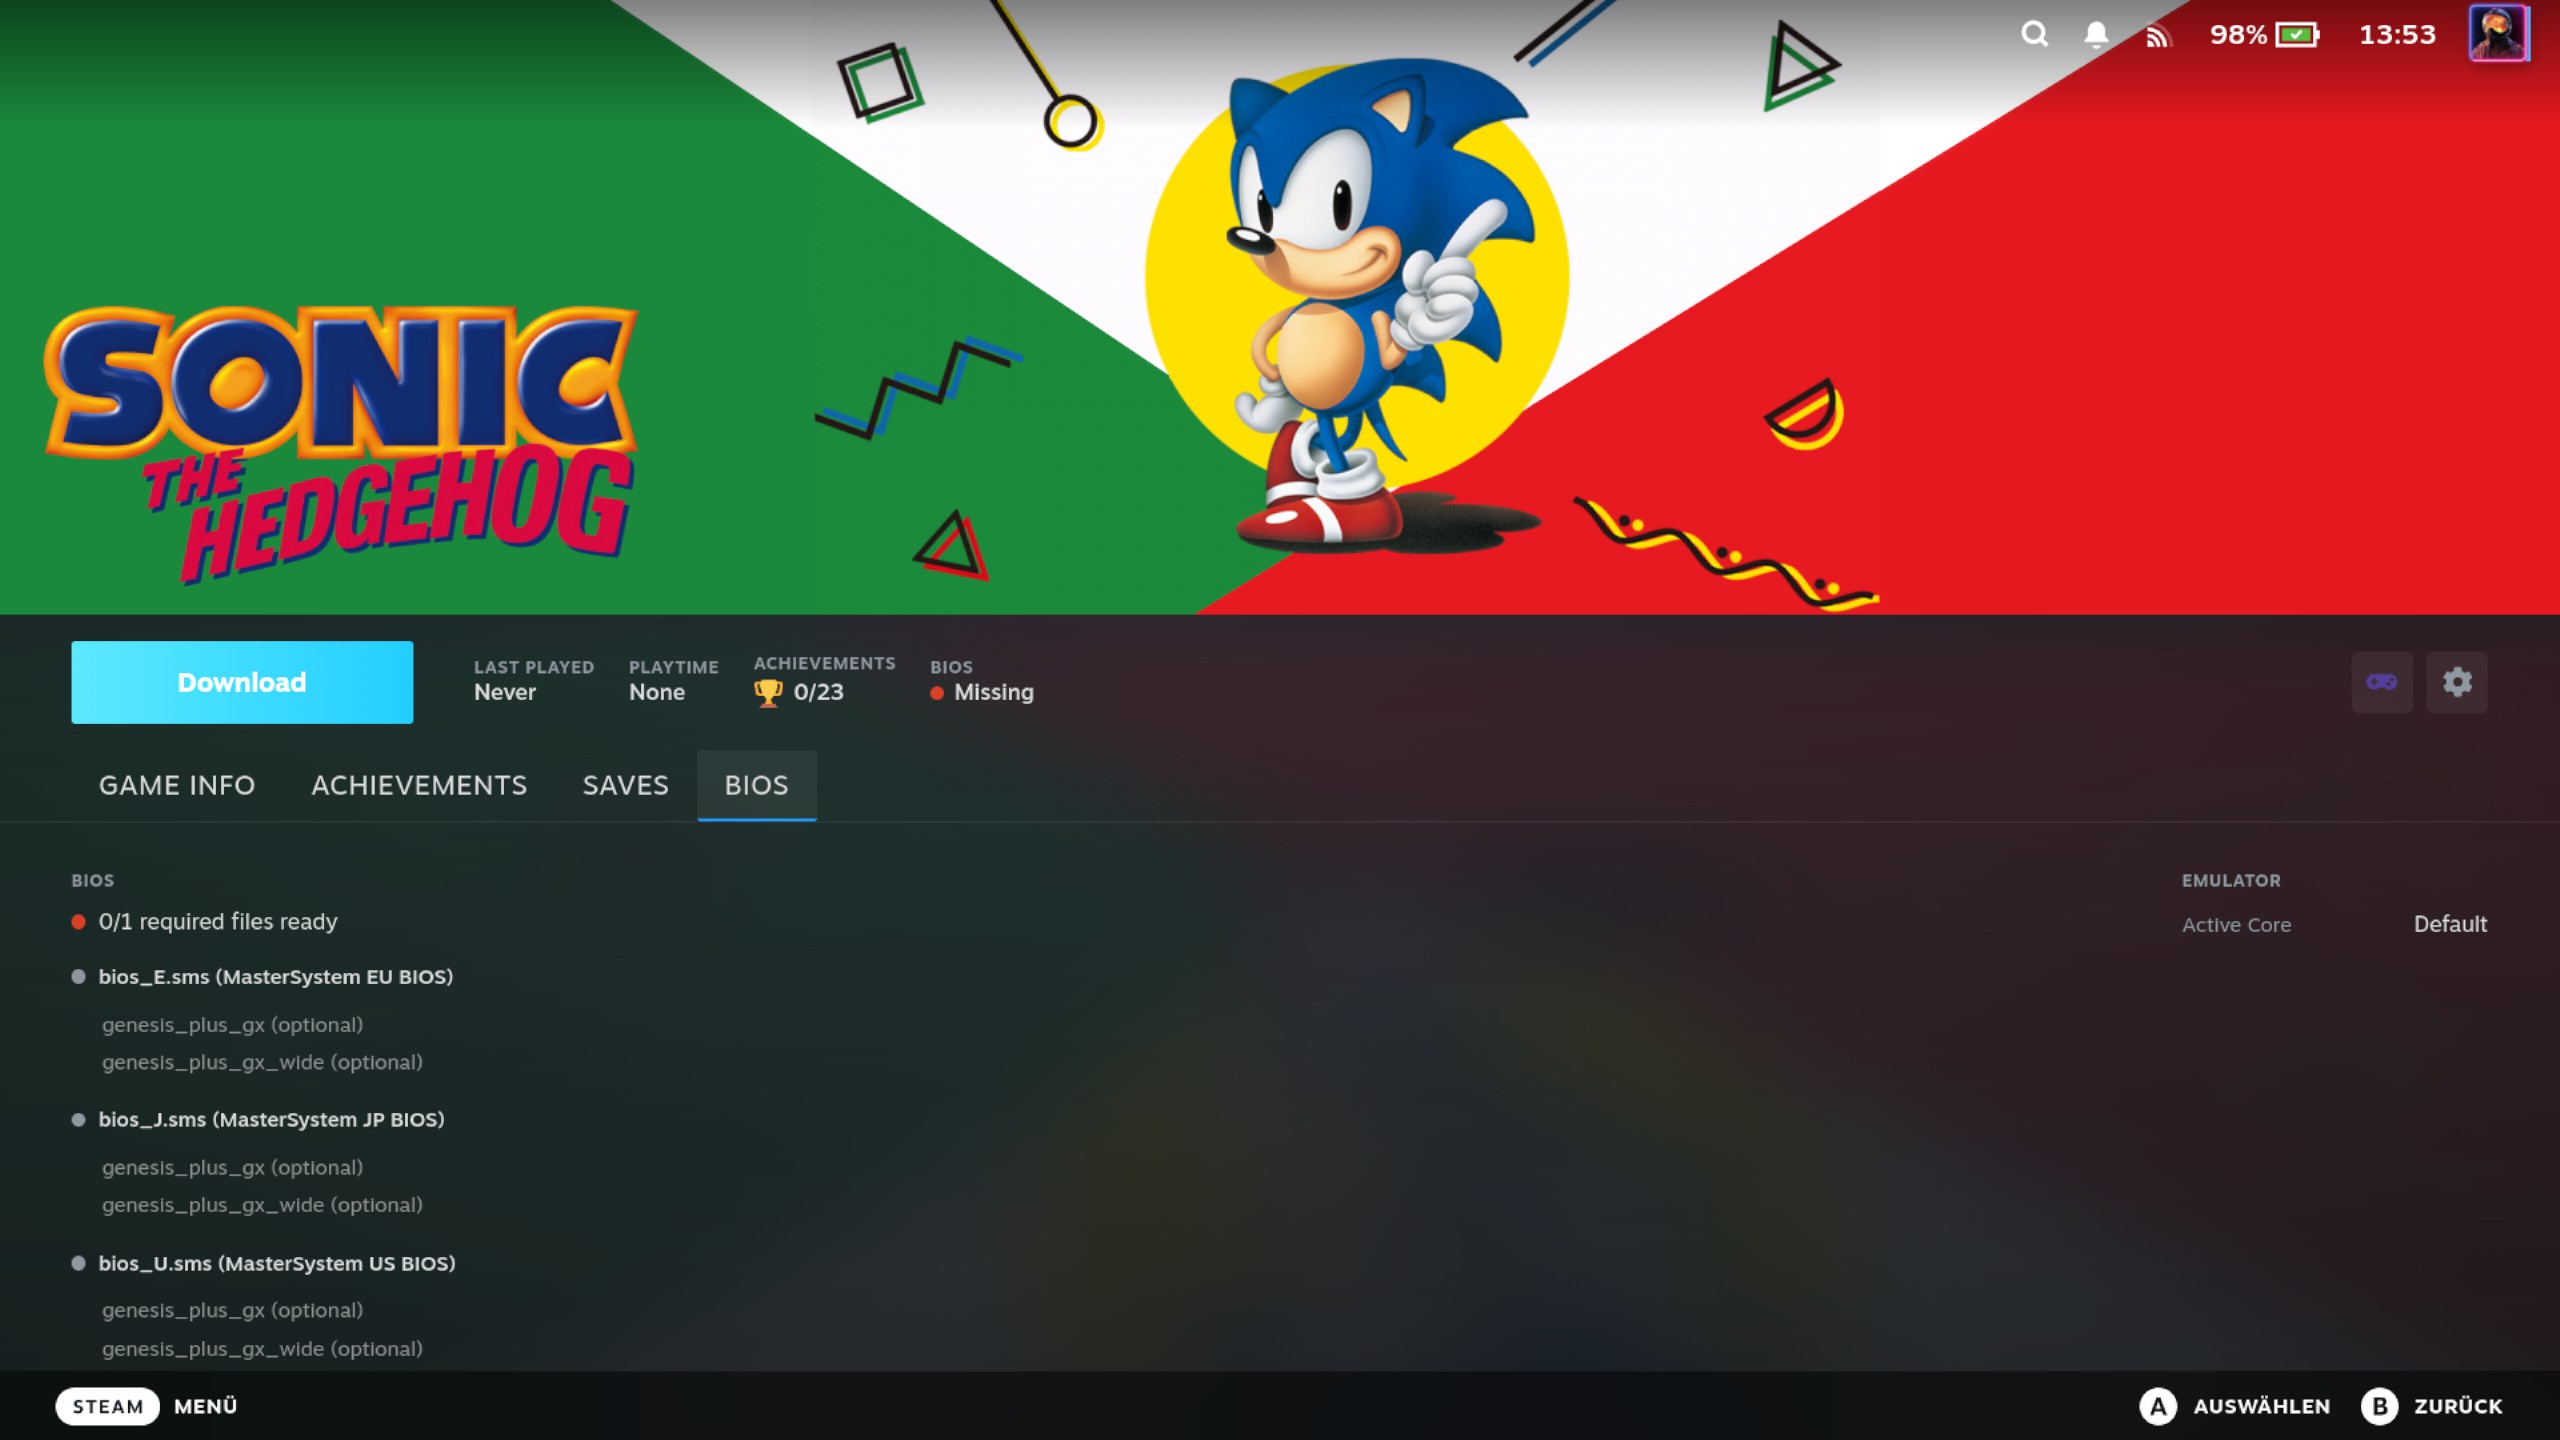
When you open a game that belongs to a platform with BIOS files on your RomM server, the game detail panel shows a BIOS status indicator. Open the panel's BIOS tab to see the readiness line. Its dot color reflects the same ok/partial/missing classification used everywhere in the plugin:
- Green — all required files present: "All required ready (3/5)" (or "All ready (3/5)" when the system has no required-vs-optional split)
- Orange — some required files present: "2/5 required files ready" (or "3/5 files ready" without a required split)
- Red — no required files present yet
The classification is computed against the active core for that game — so switching to a core that needs no BIOS (or that treats a file as optional) clears the warning, while switching to a core that requires a missing file surfaces it.
Tap the BIOS status indicator to see a detailed list of individual files and which ones are present or missing. Each file lists the cores that use it (e.g. Beetle PSX HW (required), SwanStation (optional)); the active core's line is highlighted in amber so you can spot at a glance which core's requirements the file applies to.
System Page
The System page is the per-system emulator settings page: for each platform it shows the active emulator core first, then the BIOS files that core needs. It lists only your currently-synced systems — platforms with at least one synced game (whether synced by platform or by collection). Systems you have no synced games for don't appear, even if your RomM server has BIOS files for them.
- From the main QAM page, tap System
- Platforms with synced games that still need required BIOS files are marked with "BIOS needed"
- For platforms with more than one emulator, an Emulator Core button is shown at the top of the platform's section — this is the primary per-system control; it opens a menu of the platform's emulators
- Below the core, each platform shows how many BIOS files are downloaded vs. available (e.g. "3 / 5 files")
- Tap Show Files to see the individual file list for a platform
- Tap Download All to download all missing BIOS files for a platform
- Tap Delete BIOS to remove that platform's downloaded BIOS files (see below)
BIOS files are downloaded to your RetroDECK bios directory (e.g. ~/retrodeck/bios/). Some platforms use subdirectories
— for example, Dreamcast BIOS goes into bios/dc/ and PS2 BIOS goes into bios/pcsx2/bios/. The plugin handles the
correct placement automatically.
Deleting BIOS Files
You can remove a platform's downloaded BIOS files directly from the System page. The Delete BIOS button appears only when the platform has at least one downloaded file — its label shows the count (e.g. "Delete BIOS (3)"). Because deletion is local, the button works even when your RomM server is offline.
- On the System page, find the platform whose BIOS files you want to remove
- Tap Delete BIOS
- Confirm the action in the dialog that appears
This is a destructive action, so a confirmation dialog asks you to confirm before anything is deleted. Once confirmed, the plugin removes every downloaded BIOS file for that system from your RetroDECK bios directory and reports the result. Games that need those files won't launch until you download them again with Download All or Download Required.
The same per-platform delete is also available from the Data Management page (under per-platform actions) for bulk-cleanup workflows.
Which Systems Need BIOS?
This depends on what's uploaded to your RomM server. Common systems that require BIOS files include PlayStation, PS2, Saturn, Dreamcast, and some arcade systems. The plugin only shows BIOS status for platforms that have firmware files in your RomM library.
Platforms Without Plugin Coverage ("Not managed by the plugin")
The plugin recognises BIOS files through a built-in registry, which covers the common systems above but not every platform. When a platform has firmware on your RomM server but none of those files match a registry entry, the plugin has no way to tell which files are required — so it makes no readiness claim. Instead of a green all-clear, that platform shows a neutral grey status and the text "Not managed by the plugin", along with a note listing how many files are on the server that the plugin doesn't recognise.
This is informational, not an error: your files may be perfectly fine, the plugin simply can't verify them. You can still download them manually through RomM if your emulator needs them. Genuinely BIOS-free systems (such as the NES) are unaffected — they keep showing a normal all-ready status.
Per-Platform BIOS Filtering
The plugin only shows BIOS files that belong to the platform you're looking at. For example, a GBA game page shows
gba_bios.bin only — not Game Boy or Game Boy Color BIOS files, even though the emulator core (mGBA) supports all three
systems. This filtering is built into the BIOS registry and works automatically.
Active Core Detection
Different emulator cores can have different BIOS requirements for the same platform. The plugin detects which core RetroDECK is actually configured to use and filters the BIOS list accordingly, so you only see the files that matter for your setup.
Example: Game Boy Advance
- With mGBA (RetroDECK's default),
gba_bios.binis shown as optional — mGBA has a built-in high-level BIOS replacement - With gpSP,
gba_bios.binis shown as required — gpSP cannot run without it
The active core name appears in both the game detail page (the Emulator column) and the System page. This tells you at a glance which core the plugin is filtering for.
How the core is determined:
- If you set a per-game core for this game in the plugin, that wins. (Per-game cores are stored by the plugin itself — see Per-Game (Game Detail Page) below.)
- If no per-game core, the plugin checks for a per-platform core you set on the System page — stored by the plugin in its own settings, not in ES-DE.
- The plugin reads RetroDECK's ES-DE configuration (
es_systems.xml) from the flatpak installation to find the default emulator for each platform — for BIOS filtering it uses the platform's first RetroArch core. This live file is the only source; there is no bundled fallback snapshot. - If a platform's default is a standalone emulator (no RetroArch core) or the live configuration can't be read, all BIOS files for the platform are shown — the safe default
Whatever this chain resolves to is the same core the game launches on — the plugin bakes the resolved core into the Steam shortcut, so the core shown for BIOS, saves, and the core badge always matches the core that runs.
The detection chain ensures BIOS filtering works even when RetroDECK's configuration files aren't accessible (e.g. after an update changes paths). You'll see a "Core: mGBA" badge when detection is working, or no badge when falling back to showing all files.
Changing the Active Core
You can change the active emulator core directly from the plugin, without leaving Game Mode. There are two scopes, and
both are stored by the plugin itself — neither touches ES-DE's gamelist.xml. The plugin bakes the chosen core
directly into each game's Steam shortcut, so your choice applies reliably for any ROM filename.
- Per-platform changes set the core for every game on a platform. Stored in the plugin's own settings.
- Per-game changes set the core for a single game and take priority over the platform choice. Stored by the plugin on the game, so they survive uninstalling and re-downloading.
Per-Platform (System Page)
On the System page, platforms with more than one emulator show an Emulator Core button as the first control in the platform's section, above the BIOS file list. The button opens a menu listing every emulator ES-DE offers for that platform — both RetroArch cores and standalone emulators (e.g. PCSX2, RPCS3, Dolphin, PPSSPP). Some entries appear disabled with a short reason (for example "script/shortcut form" or "needs setup files (launch via ES-DE once)") when the plugin can't launch them directly from Steam; those can't be picked. Picking an enabled emulator sets it as the default for all games on that platform. A "Switching cores may affect save compatibility" note appears at the top of the menu.
- Open the System page from the main QAM page
- Find the platform you want to change
- Press the Emulator Core button and pick an emulator from the menu
- The BIOS file list below updates immediately to show files relevant to the new choice
If RetroDECK can't be found (no es_systems.xml), the menu shows "Emulator list unavailable — RetroDECK installation
not found" instead of a list.
The plugin stores the choice in its own settings and immediately re-applies it to every installed game on that platform — the change takes effect right away, with no sync needed (games that already have a per-game core keep their own choice). The System page works even when your RomM server is offline — core switching and BIOS status are available, only download buttons are disabled.
A RetroDECK default-core change needs a Force Full Sync
Setting a per-platform core on the System page re-bakes your installed games right away. But if a RetroDECK update ships a new default core for a platform (and you have not picked a core yourself), that new default does not take effect on a normal sync — a normal sync skips platforms whose games haven't changed, so the previously-baked core stays. Run a Force Full Sync to re-bake every game and pick up RetroDECK's new default.
Per-Game (Game Detail Page)
On the game detail page, a CPU button (microchip icon) appears between the RomM and Steam gear buttons when the game's platform offers more than one emulator. The menu lists the same emulators as the System page — RetroArch cores and standalone emulators — and shows the ones the plugin can't launch from Steam as disabled with a short reason.
- Open a game's detail page
- Tap the CPU button (microchip icon)
- Pick an emulator from the menu, or the Use System Override item at the top (see below)
- The BIOS status, core badge, and game info panel update immediately
At the top of the menu, above the core list, is a dedicated Use System Override (X) item. Selecting it clears the per-game core so the game follows whatever the system would pick — the per-platform core you set on the System page, or the platform's default core when no per-platform override is set. X is that fallback core's name, shown in parentheses so you know what the game will fall back to.
Each core in the list below can show up to three markers, one per role:
- (default) — the RetroDECK/es_systems default core for this platform.
- (system) — the per-platform core you picked on the System page (stored in the plugin's settings). Absent when the platform has no per-platform override.
- ✓ (checkmark) — the core this game actually launches with right now.
The three roles are independent, so a single core can carry more than one marker: "(default) (system)" when your per-platform pick happens to equal the default, or "(system) ✓" when the per-platform core is also the one the game launches with.
A per-game core takes priority over the platform default. Every core in the list pins when you pick it — including the one marked (default). Pinning the default-marked core fixes the game to that specific core even if you later change the per-platform override; it is no longer the way to "follow the system".
To drop the per-game core and follow the platform/system core again, pick the Use System Override item at the top — that is the only thing that clears the per-game override. The ✓ can appear in two places at once: when the game is following the system (no per-game core), the Use System Override item carries the ✓ and so does the core that is actually in effect. When you pin a per-game core, only that pinned core carries the ✓ and the Use System Override item does not.
When you set or reset a per-game core for an installed game, the plugin updates the game's Steam shortcut immediately and confirms the change landed before reporting success. If Steam can't accept the change in the current session, you'll see a "Core saved — restart Steam to apply" message — your choice is still saved; it takes effect after a Steam restart (or the next sync).
Per-game cores work for any ROM filename. The plugin bakes the chosen core directly into the game's launch command, so it does not rely on RetroDECK's gamelist lookup (which mishandles parentheses and other special characters in filenames) and is not affected by that upstream limitation.
Core choices are not migrated from ES-DE
The plugin now owns core selection entirely and no longer reads or writes ES-DE's gamelist.xml. A few notes for anyone
upgrading from an older build or who edits ES-DE directly:
- Per-platform cores set in ES-DE are not carried over — re-apply them once. Earlier builds stored a per-system core
as a
<alternativeEmulator>in ES-DE'sgamelist.xml; the plugin now stores per-platform cores in its own settings and does not read or import that ES-DE entry. If you had set a per-system core, re-apply it once on the System page (the Emulator Core button/menu) and it sticks from then on. - Per-game cores set with an older plugin build are not carried over. Earlier builds stored per-game cores in
ES-DE's
gamelist.xml; the plugin now stores them itself and does not import the old entries. Re-apply any per-game core once through the CPU-button menu and it sticks from then on (including across uninstall/re-download). - A core set directly in ES-DE is not seen by the plugin. If you pick a core for a game (or a system) in ES-DE's own interface, the plugin's BIOS badge, per-core save path, and core-change warning will not reflect it — those follow the core the plugin knows about, and the plugin's launches always use the core it has baked in. ES-DE-native launches still honour your ES-DE setting. To keep the plugin's badges, save paths, and launches in sync, set the core through the plugin (the CPU-button menu for one game, the System page for a whole platform) instead.
Non-Default Core Indicator
The CPU button changes color to indicate the active core status:
- Gray — the default core is active (no overrides)
- Yellow — a non-default core is active (per-game or per-platform override)
The game detail info panel shows the active core in a dedicated "Emulator" column alongside the BIOS status, using a two-column layout.
Previous: Managing Games | Next: RetroDECK Path Migration